


Sack gardening has evolved from a simple survival tactic into a sophisticated urban farming trend in 2026. This method allows anyone with a few square feet of space to cultivate high-quality, organic produce right at home. It is particularly effective for urban dwellers, renters, and beginners who lack access to vast arable land.
Table of Contents
Growing tomatoes in sacks offers a controlled environment that drastically reduces the risk of soil-borne diseases. The vertical nature of this technique maximizes yield per square foot, making it an efficient solution for balconies and small backyards. By following this guide, you will master the art of sustainable food production.
You will learn everything from selecting the right tomato varieties to mixing the perfect soil blend. We will also cover pest management and harvesting techniques tailored for the modern sack gardener. Prepare to transform your small space into a productive agricultural hub.
Why Grow Tomatoes in Sacks? (2026 Trend Insight)

Sack gardening addresses critical land scarcity issues while offering superior drainage control compared to traditional plots. It minimizes weed growth and prevents common soil diseases by using isolated, treated soil mediums. This method is highly portable, allowing farmers to move plants to follow the sun or avoid harsh weather.
Space-Saving and Urban Suitability
The primary driver for sack gardening in 2026 is the shrinking availability of land in urban centers. A standard 90kg sack occupies less than two square feet but can support up to three productive tomato plants. This density allows a small balcony to produce enough tomatoes for a household.
Enhanced Disease and Soil Control
Soil-borne diseases like bacterial wilt are devastating and difficult to eradicate from open fields. Sack farming isolates the plant, meaning if one sack gets infected, it can be removed without affecting the rest. Farmers can also custom-mix their soil to ensure perfect drainage and nutrient content.
Water Conservation and Sustainability
Water scarcity is a growing concern, and sack gardening utilizes water far more efficiently than open rows. The water is applied directly to the root zone, reducing evaporation and runoff significantly. This targeted irrigation makes it an eco-friendly choice for climate-conscious growers.
Best Tomato Varieties for Sack Gardening

Choosing the correct variety is the single most important decision for a successful harvest. In 2026, hybrid varieties are preferred for their disease resistance and high yields in confined root spaces. You must decide between determinate and indeterminate types based on your space and harvest goals.
Read Also: How to Grow Bulb Onions in Crates: Step by Step Guide for Kenyan Farmers
Determinate vs Indeterminate Varieties
Determinate varieties are bush-like plants that grow to a fixed height and ripen all their fruit within a short window. They are excellent for sacks because they do not require tall trellises or complex pruning. These are ideal for beginners who want a manageable, one-time harvest.
Indeterminate varieties grow as vining plants that continue to lengthen and produce fruit throughout the season. They require tall stakes and regular pruning but offer a higher overall yield over a longer period. These are perfect for maximizing vertical space on patios.
Recommended Varieties for 2026

Cherry tomatoes remain the top recommendation for beginners due to their hardiness and prolific production. Varieties like Sweet 100 thrive in sacks and ripen quickly. For larger fruit, Roma tomatoes are excellent determinate choices for processing and cooking.
For those facing high temperatures, heat-tolerant hybrids like Solar Fire are essential to prevent blossom drop. Patio hybrids have also been genetically improved to produce full-sized fruit on compact plants. Always check the seed packet for resistance codes against blight and wilt.
Where to Buy Best Tomatoes varieties in Kenya

Buy authentic seeds and supplies from certified stockists like Kenya Seed Company or Simlaw Seeds to ensure germination quality. Major agro-vets in towns like Nairobi, Eldoret, and Mombasa stock UV-treated sacks specifically designed for farming. Online platforms such as iShamba or DigiFarm also offer verified inputs with delivery options.
Certified Seed Merchants
To avoid counterfeit seeds, purchase directly from Kenya Seed Company outlets or authorized agents. Simlaw Seeds, a subsidiary, specializes in horticultural seeds and offers varieties specifically bred for East African climates. Supermarkets with gardening sections often stock these reputable brands.
Sourcing Farming Sacks
You can purchase standard woven polypropylene sacks from local cereal markets or hardware stores. However, for durability, look for UV-treated vertical farming bags available at specialized agro-vets in River Road or Gikomba Market. These specialized bags last longer and often come with pre-punched planting pockets.
Fertilizers and Soil Inputs
Quality topsoil and manure can be sourced from local nurseries found along major highways like Waiyaki Way or Ngong Road. Ensure the manure is well-rotted to prevent burning your crops. Specialized fertilizers like YaraMila are available at any licensed agro-vet across the country.
Materials You’ll Need

Gathering the right materials before you start prevents interruptions during the planting process. The investment is relatively low, and many items can be reused for multiple seasons. Quality inputs are directly linked to the health and longevity of your tomato plants.
Essential Checklist
First, acquire strong polypropylene sacks (50kg or 90kg size) that are clean and free of chemical residues. You will need a mixture of quality topsoil, compost or well-rotted manure, and coarse sand. A watering can or a simple drip irrigation kit is necessary for consistent moisture.
Read Also: Tomato Farming in Kenya 2026: Cost per Acre and Profit Analysis
Support structures are vital, so have ample wooden stakes or tomato cages ready. You will also need mulch, such as dry grass or straw, to cover the soil surface. Finally, purchase your selected tomato seedlings or seeds.
Optional Boosters
Epsom salt is a great addition to help with magnesium uptake and plant greening. Neem oil is a critical organic pesticide to have on hand for early pest management. Liquid seaweed fertilizer can provide a quick nutrient boost during the flowering stage.
How do you prepare the nutrient mix and sacks for maximum drainage?

The optimal soil ratio for sack farming is 2:1:1, representing two parts topsoil, one part cured manure, and one part sand or gravel for drainage. Sacks must have holes punched at specific intervals to prevent waterlogging. In 2026, many farmers incorporate coco peat to enhance moisture retention while maintaining aeration.
Soil Composition Strategy
The “shamba” inside your sack must be nutrient-dense because the roots cannot forage elsewhere. Avoid using soil from areas where tomatoes, potatoes, or peppers were previously grown to prevent bacterial wilt. Forest soil or virgin land soil is the safest option.
Mix the soil with well-decomposed manure. Fresh manure burns the roots and introduces weeds. Ensure the manure has cured for at least three months. If available, add a handful of DAP fertilizer or bone meal to the mix to boost root development during the transplanting phase.
Sack Architecture
Use standard 90kg bags or specialized vertical growing bags. Create a central column of gravel running down the middle of the sack. This acts as the irrigation channel, ensuring water reaches the bottom roots without drowning the top section.
Step-by-Step Guide to Growing Tomatoes in Sacks
Step 1: Choose the Right Location
Tomatoes are sun-loving plants that require at least 6 to 8 hours of direct sunlight daily. Place your sacks in an area that receives morning sun and has protection from strong afternoon winds. Ensure the location has good airflow to dry foliage quickly and prevent fungal diseases.
Step 2: Prepare the Sack
Fold down the top edge of the sack to create a sturdy rim and improve stability. Punch small drainage holes at the bottom and along the lower sides to prevent waterlogging. Place a layer of small stones or gravel at the very bottom to facilitate free drainage.
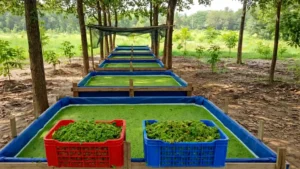
Step 3: Prepare the Soil Mix (Ideal 2026 Mix)
The ideal soil mix is a ratio of 40% topsoil, 40% compost, and 20% sand. This combination ensures the soil holds moisture without becoming compacted or waterlogged. Mixing in a handful of bone meal or organic fertilizer at this stage promotes strong root development.
[IMAGE] A gardener using a shovel to mix a pile of dark topsoil, manure, and sand next to empty white woven sacks.
Step 4: Fill and Plant
Fill the sack until it is about three-quarters full, leaving space for top-dressing later. Water the soil thoroughly a day before planting to ensure it is moist but not soggy. Plant 2 to 3 seedlings per sack, spacing them evenly in a triangle formation.
Step 5: Support the Plants
Insert your stakes immediately after planting to avoid damaging the roots later. As the plants grow, gently tie the main stem to the stake using soft twine or fabric strips. This vertical support is crucial for keeping fruit off the soil and improving air circulation.
Step 6: Watering Schedule
Water your sacks consistently, keeping the soil moist but never waterlogged. The best time to water is early in the morning, which allows the plant to hydrate before the midday heat. Avoid wetting the leaves, as wet foliage invites blight and other fungal infections.
Step 7: Fertilizing for Maximum Yield
Start feeding your plants with a balanced liquid fertilizer two weeks after transplanting. Switch to a potassium-rich fertilizer once the first flowers appear to encourage fruit set. Watch for yellowing leaves, which may indicate a need for a nitrogen boost.
Common Problems and Solutions
Even with the best care, tomato plants in sacks can face challenges. Early detection and rapid response are key to saving your crop. In 2026, organic solutions are preferred to maintain safety and sustainability.
Read Also: Best Onion Varieties for the 2026 Short Rains: Red Coach vs. Neptune
Yellow Leaves and Deficiencies
Yellowing lower leaves often indicate a nitrogen deficiency, which can be fixed with compost tea or blood meal. If the leaves are yellowing but the veins remain green, it might be a magnesium deficiency solvable with Epsom salt. Overwatering can also cause yellowing, so check your drainage holes immediately.
Blossom End Rot
This condition appears as a dark, sunken spot at the bottom of the fruit. It is caused by calcium deficiency, often triggered by inconsistent watering preventing calcium uptake. Maintain steady soil moisture and mulch heavily to prevent this physiological disorder.
Pests and Diseases
Aphids and whiteflies are common pests that suck sap and weaken the plant. Spray a mixture of water, dish soap, and neem oil to control these soft-bodied insects. Tomato blight is a fungal threat; prevent it by spacing sacks properly and removing infected leaves immediately.
How Long Do Tomatoes Take to Grow in Sacks?
Tomato seeds typically germinate within 5 to 10 days under warm conditions. Seedlings are ready for transplanting into sacks after 3 to 4 weeks in the nursery. The time from transplant to the first harvest ranges from 60 to 90 days, depending on whether the variety is early-maturing or late-maturing.
Germination to Flowering
After transplanting, the plants will focus on vegetative growth for the first month. You should see the first yellow flowers appearing between weeks 4 and 6. This is a critical time to ensure consistent watering to prevent flower drop.
Harvest Timeline
Fruits will begin to set shortly after flowering and will take another month to reach full size and ripen. Cherry tomatoes are usually the fastest to mature, often ready in just 60 days. larger varieties like Beefsteak or Roma may require up to 85 or 90 days.
Yield Expectations in 2026
Sack gardening is surprisingly productive when managed correctly. A single well-tended sack can produce between 10 to 15 kilograms of tomatoes per season. High-yield hybrid varieties can push this number even higher with optimal fertilization.
Maximizing Production
To increase your yield, focus on soil health and regular feeding. Pruning indeterminate varieties to a single or double stem concentrates energy into fruit production. Harvesting ripe fruit promptly encourages the plant to produce more flowers and continue the cycle.

How does sack farming profitability compare across different Kenyan counties?
Profitability varies based on water access and proximity to markets, with Nairobi offering the highest margins due to direct consumer sales. However, production costs in Nairobi are higher due to water tariffs. Rural counties like Meru have lower input costs but incur higher transport fees to reach premium buyers.
Module C: Regional Comparative Analysis (2026)
Nairobi & Kiambu (Peri-Urban): These areas represent the highest profitability potential due to the “Farm-to-Fork” model. Farmers here sell directly to households and restaurants, bypassing middlemen.
Advantage: High price per kg (KES 100-150).
Challenge: Expensive water and scarcity of quality topsoil.
Meru & Kirinyaga (High Production Zones): Farmers here have access to rich volcanic soils and affordable manure. The climate is ideal, reducing the need for expensive chemical interventions.
Advantage: Low cost of production per sack.
Challenge: Market saturation during peak seasons lowers prices to KES 40-60 per kg.
Mombasa & Kilifi (Coastal): High humidity creates fungal challenges, but demand from the tourism sector is massive.
Advantage: consistent year-round demand from hotels.
Challenge: Heat stress management requires shade nets, increasing startup capital.
What is the optimal 12-month farming calendar for sack tomatoes?
To maximize revenue, farmers should target the “high season” markets in April and December. This requires starting nurseries in January and September respectively. Avoiding the heavy rain peaks of May reduces fungal diseases, while irrigation during dry months guarantees a harvest when market supply is low.
Module D: 12-Month Farming Calendar
January – February (Nursery Phase): Hot and dry. Perfect for establishing nurseries as disease pressure is low. Water management is critical here. Sowing now targets the April rains for vegetative growth.
March – April (Transplanting & Growth): Transplant seedlings into sacks. The onset of long rains aids establishment but requires vigilance against blight. Apply preventive copper-based fungicides weekly.
May – June (Flowering & Fruiting): Temperatures drop. Reduce watering to prevent blossom end rot. Top-dress with CAN fertilizer to support fruit expansion. Stake plants firmly as fruit weight increases.
July – August (Harvesting): First harvest begins. Prices are usually moderate. Focus on post-harvest handling to minimize losses. Prepare the next batch of seedlings immediately for the short rain season.
September – October (Second Cycle): Transplant the second crop. This is a critical window to hit the festive December market. Pests like Red Spider Mite are active in dry spells; scout daily.
November – December (Peak Harvest): Demand peaks due to festivities. Prices often double. Harvest at the “breaker” stage (half-ripe) if transporting long distances to maintain quality.
How much capital is required to start a 100-sack unit in 2026?
Starting a 100-sack project requires approximately KES 35,000 to KES 45,000. This covers sacks, soil, manure, seeds, chemicals, and labor. Break-even typically occurs after the first harvest, with a potential net profit of KES 80,000 to KES 120,000 per cycle depending on market prices.
Module E: Deep-Dive Financials (2026 Estimates)
The following analysis assumes a 100-sack urban setup using paid water and labor. Costs may be lower for rural farmers using family labor and river water.
Startup Costs (One-Off & Recurring)
| Item | Quantity | Unit Cost (KES) | Total (KES) |
|---|---|---|---|
| Sacks (90kg bags) | 100 | 50 | 5,000 |
| Manure (7-ton lorry) | 1 | 12,000 | 12,000 |
| Certified Seeds (F1) | 10g packet | 2,500 | 2,500 |
| Pesticides/Fungicides | Assorted | 5,000 | 5,000 |
| Labor (Sack filling) | 3 Days | 1,000 | 3,000 |
| Water (4 months) | Estimate | – | 8,000 |
| Stakes/Twine | Lump sum | 2,000 | 2,000 |
| TOTAL INVESTMENT | 37,500 |
Revenue Projections
A well-managed sack produces roughly 15kg to 20kg of tomatoes per lifecycle (4-5 months).
Total Yield: 100 sacks x 18kg = 1,800 kg.
Average Price: KES 80 per kg (2026 conservative average).
Gross Revenue: 1,800kg x 80 = KES 144,000.
Net Profit Calculation
Net Profit: KES 144,000 (Revenue) – KES 37,500 (Cost) = KES 106,500.
This represents a Return on Investment (ROI) of nearly 280% over 5 months. Subsequent seasons are cheaper as the soil and sacks are already in place.
How can farmers optimize the supply chain and add value?
Farmers can bypass brokers by forming clusters to supply supermarkets or institutions directly. Value addition involves processing unsold or Grade B ripe tomatoes into purees, jams, or sun-dried tomatoes. This extends shelf life from 1 week to 6 months and stabilizes income during market gluts.

Module F: Supply Chain & Value Addition
The “broker menace” continues to be the biggest hurdle for Kenyan farmers. In 2026, the solution lies in digital aggregation. Farmers using apps like Twiga Foods or M-Farm can lock in prices before harvest. This eliminates the unpredictability of the open-air market.
Read Also: How to Grow Tomatoes in Buckets 2026: Best High Yield Varieties and Container Farming Tips for Kenyan Farmers
Post-harvest handling is where 30% of profits are lost. Tomatoes should never be stacked in deep 90kg bags during transport, as the bottom layers get crushed. Use rigid plastic crates (known as “skaf”) that stack without compressing the fruit.
For value addition, simple home-based processing can turn losses into profits. Blanching and jarring tomatoes allows you to sell “Ready-to-Cook” tomato bases to busy urban professionals. This product commands a premium price and utilizes fruits that are too ripe for transport.
2026 Outlook and Conclusion
The future of tomato farming in Kenya is vertical and data-driven. As urbanization consumes arable land, sack farming transforms from a hobby into a critical component of the national food security architecture. The 2026 outlook indicates that small-scale intense farming will outperform traditional extensive farming in profitability per acre.
Beginner farmers must treat this as a business, not a pastime. Record keeping, strict hygiene, and marketing are as important as watering. By adopting the methods outlined in this guide, you position yourself to capitalize on the growing demand for fresh, traceable, locally grown produce.
Start small with 20 to 50 sacks to master the learning curve. Scale up once you have secured a reliable buyer. The opportunity is in your hands, and your sacks.


: Which Makes More Money? 12")


where can I found the seed,
in Zambia
Hi In zambia, please visit local agrovets and ask if they have the seeds.
natoa ushauri au maoni andaeni (App) ambayo mkulima ataidownload na kujifunzia uko
Thank you so much, unfortunately our app will be ready soonest, keep eye on our social media, we shall update there.