In a world where food prices are volatile and water is becoming a precious commodity, the “smart farmer” doesn’t just work harder, they work smarter. The following guide breaks down the revolutionary, low-cost irrigation system showcased by CKTV, designed specifically to reduce hunger and foster agricultural independence.
This isn’t just about watering plants; it is about a philosophy of “Ukulima Smart” (Smart Farming) that rejects the traditional reliance on expensive municipal tap water and embraces self-sufficiency.
I. The Core Philosophy: Why “Smart” Farming?
Traditional gardening often involves the “bucket and splash” method, which is not only back-breaking but also incredibly wasteful. Much of the water evaporates before it ever reaches the roots, or worse, it causes soil erosion.
Our presenter from CKTV advocates for a shift in perspective:
- Independence: “Usingoje maji ya tap” (Don’t wait for tap water). This system allows you to store and manage your own water supply.
- Precision: By using a drip-style distribution, water is delivered exactly where it is needed, the roots minimizing waste.
- Scalability: Whether you have a small backyard plot or a larger kitchen garden, this modular setup using 20-liter jerry cans can be expanded indefinitely.
II. Master Materials List
Before you begin construction, you will need to gather the following materials. This system is designed to be affordable, often utilizing recycled items found around the home or local hardware store.

The “Smart” Tool Kit
| Component | Purpose | Details |
| 20-Liter Jerry Cans | Water Reservoirs | Durable plastic containers (yellow cans shown). |
| Concrete Blocks | Elevation Stands | Standard building blocks to create gravity pressure. |
| Flexible Hoses | Distribution Lines | 1/2 inch or 3/4 inch black irrigation tubing. |
| Tank Connectors | The Link | Threaded fittings to connect the hose to the jerry can base. |
| End Caps | System Seal | Plugs to stop the water at the end of each crop row. |
| Perforation Tool | Drip Holes | A small nail or specialized drip emitters for the hose. |
Where to Buy Your Materials

To keep this system low-cost, as emphasized by CKTV, you can source materials from a mix of specialized agricultural shops and local hardware stores. In Kenya, these items are widely available.
1. Specialized Irrigation Suppliers
For “smart” components like flexible drip hoses, tank connectors (nipples), and end plugs.
READ ALSO: Spinach Farming in Kenya 2026: Best Varieties,, Costs, Yields and Profit per Acre
- Aqua Hub Kenya: Locations in Nairobi and Eldoret. They specialize in “Kitchen Garden Kits” and individual drip components.
- Grekkon Limited: Branches in Nairobi, Eldoret, Kisumu, and Nyahururu. They are known for UV-treated drip lines that last longer in the sun.
- Ago Ventures: Based in Nairobi (Embakasi), they stock a wide range of irrigation fittings and connectors.
- Namani Irrigation: Located along the Eastern Bypass (Utawala), perfect for those in the Nairobi metropolitan area.
2. Local Hardware Stores & Markets
For structural items like concrete blocks and reservoirs.
- Jerry Cans (20L): While you can buy new ones at Jumia Kenya or Metro Stores, a “smart farmer” often buys used food-grade plastic cans at local open-air markets (like Gikomba or Kongowea) for a fraction of the price (usually KSh 50–300).
- Concrete Blocks: Visit any local yard or stores like EcoConcrete (Parklands/Kajiado) or Structural Construction and Interiors. Prices usually range from KSh 50–90 per block.
- General Hardware chains: Stores like Eldad Hardware (Eastern Bypass) or Lavington Hardware stock PVC pipes and basic plumbing tools needed for the setup.
3. Agrovets
Most local Agrovets in rural and peri-urban areas now stock “micro-irrigation” parts. Ask for “barbed fittings” or “drip take-offs” to connect your hose to the jerry can.
Estimated Budget for One Row (Approximate)
| Item | Quantity | Estimated Cost (KSh) |
| Used 20L Jerry Can | 1 | 250 |
| Concrete Blocks | 2 | 140 |
| 10m Drip Hose | 1 | 200 |
| Tank Connector/Nipple | 1 | 100 |
| Total | KSh 690 |
III. Step-by-Step Installation Guide
Step 1: Land Preparation and Row Design
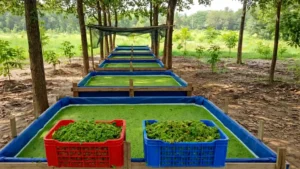
Before placing a single block, you must prepare your soil. In the CKTV demonstration, the soil is well-tilled, dark, and arranged into raised beds or distinct rows.
- Clear the Area: Remove weeds and large rocks that might obstruct the hose lines.
- Create Your Rows: Space your rows approximately 30–50 cm apart, depending on the crop (onions and greens are shown spaced tightly).
- Leveling: While the system uses gravity, you want the rows to be relatively level so that the water doesn’t rush to the end of the hose and flood the last few plants while leaving the first ones dry.
Step 2: Constructing the Gravity Stands
Pressure in a fluid system is determined by height. The higher the water source, the stronger the flow.
- Foundation: Place a concrete block at the head of each row.
- Stacking: For a 20-liter system, stacking two to three blocks (roughly 40–60 cm high) provides sufficient pressure for a row length of 5–10 meters.
- Stability Check: Ensure the blocks are on firm ground. A full 20-liter jerry can weighs approximately 20 kg; it must not wobble.
READ ALSO: How to Grow Tomatoes in Plastic Containers with a Self-Watering System (Beginner’s Guide 2026)
Step 3: Preparing the Jerry Can Reservoirs
The jerry can is the “battery” of your irrigation system, storing the energy (water) for later use.
- Cleaning: Thoroughly rinse the jerry cans to ensure no chemical residue remains that could harm your plants.
- Drilling: Using a hole saw or a heated metal pipe, create a hole near the bottom of the can—about 2 inches from the base. This prevents sediment at the bottom of the can from entering and clogging your hoses.
- Fitting the Connector: Install a waterproof tank connector. Use rubber gaskets on both the inside and outside of the can to ensure a leak-proof seal.
Step 4: Deploying the Distribution Lines
This is where the “smart” part of the farming happens. The hoses act as the veins of your garden.
- Connection: Attach your flexible black hose to the jerry can connector.
- Layout: Run the hose down the center of the crop row, keeping it as straight as possible.
- Securing: Use small “U” shaped wire stakes to pin the hose to the ground, ensuring it doesn’t shift during wind or heavy rain.
- Sealing the End: At the far end of the row, fold the hose over and secure it with a cable tie or an end-cap plug.
Step 5: Calibrating the Drip
Once the system is laid out, you must ensure the water actually reaches the plants.
- Perforation: Using a small needle or a 1mm drill bit, poke holes in the hose exactly where each plant is located.
- Testing: Fill the jerry can with water. Watch the flow. If the water is spraying too hard, your holes are too big; if it’s barely dripping, you may need to clear an obstruction or increase the height of your blocks.
IV. Crop-Specific Applications
The video demonstrates this system working for a variety of garden staples:
- Onions: These require consistent moisture but hate “wet feet.” The drip system allows the soil to stay damp without becoming waterlogged.
- Leafy Greens (Sukuma Wiki/Spinach): These plants have high transpiration rates. A steady supply of water from the jerry can ensures they stay crisp and nutrient-dense.
- Banana Trees: While the primary focus is on the rows, the background shows larger trees that can benefit from the overflow or secondary lines.
V. Maintenance: Keeping the System “Smart”
A smart farmer knows that installation is only half the battle. Maintenance ensures longevity.
- Filter the Water: If you are using pond or rainwater, place a piece of mesh cloth over the mouth of the jerry can when filling it. This prevents debris from clogging the small drip holes.
- Flush the Lines: Once a month, remove the end caps and fill the jerry can to the brim. Let the water rush through the hose to flush out any silt or algae buildup.
- Sun Protection: If possible, paint the clear or yellow jerry cans a darker color or cover them with a sack. This prevents sunlight from reaching the water inside, which stops algae from growing.
VI. The Economic Impact: Why This Matters
The CKTV presenter is clear about the mission: “We want to reduce hunger by next year”.
By implementing this system, a household can:
- Reduce Water Bills: By not relying on treated tap water for irrigation, household expenses drop significantly.
- Year-Round Production: You are no longer “waiting for the rain.” You can grow food during the dry season when market prices for vegetables are at their highest.
- Self-Employment: This setup is professional enough to produce surplus crops for sale, turning a kitchen garden into a small business.
Where to Buy Certified Seedlings for Your Smart Garden
To ensure your gravity-fed irrigation system produces a high-yield harvest, starting with certified, disease-free seedlings is essential. While the video features leafy greens and onions, here is where you can source top-quality planting materials in Kenya:
READ ALSO: How to Grow Tomatoes in Sacks: A Complete Step-by-Step Guide for 2026
1. Kenya Agricultural and Livestock Research Organization (KALRO)
KALRO is the primary source for certified seeds and seedlings. They have centers across the country (Nairobi, Katumani, Mwea, etc.) that offer improved varieties of:
- Leafy Greens: Sukuma Wiki (Kale), Spinach, and Managu.
- Onions: Red and white bulb onion varieties optimized for local soil.
2. Kenya Plant Health Inspectorate Service (KEPHIS)
While KEPHIS is a regulator, they provide a directory of certified nurseries. Always look for the KEPHIS certification sticker when buying from a private nursery to ensure your seedlings aren’t carrying soil-borne diseases.
3. Major Commercial Seed Companies
For those who prefer to raise their own seedlings using the drip system, these companies offer certified seeds at most Agrovets:
- Kenya Seed Company: Reliable for a wide range of vegetable seeds.
- Simlaw Seeds: Excellent for high-yielding onion and cabbage varieties.
- East African Seeds: Known for hybrid varieties that are drought-tolerant and pest-resistant.
4. Certified Private Nurseries
- Plant-Pals (Nairobi/Limuru): A popular choice for high-quality vegetable seedlings ready for transplanting.
- AAA Growers: Often have surplus export-quality seedlings available for local farmers.
- Mkulima Young Forum: A digital marketplace where you can find KEPHIS-certified nurseries in your specific county.
Smart Farmer Tip: When buying seedlings for a drip system like the one from CKTV, ask for “plug seedlings.” These are grown in trays with a small ball of soil around the roots, making them easier to transplant directly next to your irrigation holes without causing root shock.
Fueling Your Crops: Fertilizer and Manure Strategy
To achieve the “Smart Farming” goal of high yields and food security, your irrigation system must be paired with a robust nutrient plan. Onions and leafy greens are “heavy feeders,” which means they require rich soil to thrive.
1. The Organic Foundation: Manure
Before you even lay your drip lines, you must enrich the soil. Manure improves soil structure and helps it hold onto the water delivered by your jerry cans.
- Recommended Types: Use well-decomposed cow, goat, or poultry manure.
- Warning: Never use fresh manure. It can burn the delicate roots of your seedlings and may introduce pests or “Pink Root” disease to your onions.
- Application Rate: Apply about 1 to 2 buckets of manure per square meter (roughly 8 to 10 tons per acre) and mix it thoroughly into the soil during land preparation.
2. Basal Fertilization (At Planting)
When transplanting your seedlings, they need a “starter” boost of Phosphorus to develop strong, deep roots.
- Choice: Use DAP (Diammonium Phosphate) or TSP (Triple Super Phosphate).
- Rate: Apply approximately 10 grams (one tablespoon) per planting hole. Ensure it is mixed with the soil so it does not touch the roots directly.
3. Top-Dressing (Growth Phase)
Once your plants are established (about 2 to 4 weeks after transplanting), they need Nitrogen for leafy growth and Potassium for bulb size.
- For Leafy Greens (Kales/Spinach): Apply CAN (Calcium Ammonium Nitrate) at 2 weeks and again at 4 weeks to keep leaves lush and green.
- For Onions: Use a balanced fertilizer like NPK 17:17:17 or YaraMila Winner. Avoid excessive Nitrogen late in the season, as it can cause “thick necks” and prevent onions from storing well.
READ ALSO: Coriander Varieties in Kenya: Best Dhania Types, Yields and Market Demand 2026
4. The “Smart” Edge: Fertigation
Since you have a gravity-fed reservoir (the jerry can), you can practice fertigation. This involves dissolving water-soluble fertilizers directly into the water.
- How to do it: Dissolve a water-soluble foliar feed (like Easy Gro or Goldchance) into the jerry can once a week.
- Benefit: This delivers nutrients directly to the root zone with zero waste. It can reduce your total fertilizer costs by up to 30% to 50%.
Conclusion: Becoming a Smart Farmer
The transition to “Smart Farming” is not just a technical change; it’s a commitment to resilience. As shown in the CKTV demonstration, you don’t need a massive budget or high-tech sensors to be efficient. With a few jerry cans, some concrete blocks, and a bit of determination, you can take control of your food supply.

The “Smart Farming” is more than just a technical upgrade; it is a vital step toward personal and national food sovereignty. By adopting the gravity-fed irrigation system, you are choosing a path that bypasses the high costs of electricity and the unreliability of municipal water.
As we look toward a future where climate patterns are increasingly unpredictable, the ability to maintain a lush, productive garden with minimal resources is the ultimate survival skill. This system proves that you don’t need expensive high-tech machinery to be “smart”, you only need a few jerry cans, a bit of ingenuity, and the determination to grow your own way.
“Don’t wait for the rain, and don’t wait for tap water. Be a smart farmer today and help us reduce hunger.”
The tools are affordable, the method is proven, and the time to start is now. Whether you are planting your first row of onions or expanding a commercial kitchen garden, remember that every drop saved is a step toward a more secure and prosperous future
“Adapt to this irrigation watering system… be a smart farmer.”
Quick FAQ: Gravity-Fed Smart Irrigation
1. How high should I stack the concrete blocks? For a 20-liter jerry can system, you should stack your blocks at least two to three layers high (roughly 40 to 60 cm). Gravity pressure is determined by height; the higher the reservoir, the more effectively the water will flow to the end of your crop rows.
2. How many plants can one 20-liter jerry can serve? A single 20-liter system can typically support 50 to 100 plants depending on the crop type and weather. For larger kitchen gardens, it is best to use multiple jerry cans (one per row) to ensure consistent pressure across the entire plot.
3. Do I need a filter for the water? Yes. Even if the water looks clear, small particles can clog the drip holes in your hose. You can make a simple, low-cost filter by placing a fine mesh cloth or a piece of nylon stocking over the mouth of the jerry can when filling it.
4. Can I use this system on a slope? Yes, but you must place your jerry can reservoirs at the highest point of the slope. Gravity will naturally pull the water downward. If your garden is on a steep hill, you may need to use “pressure-compensating” emitters to prevent the plants at the bottom from getting too much water.
5. How often should I flush the irrigation hoses? You should flush your lines at least once a month. To do this, simply remove the end caps from your hoses and let the water flow through freely for a minute. This clears out any silt or algae buildup that could eventually block the system.